Automating Metrology Data on Machining Centers:
Enabling Smart Machining
By Ray Karadayi
President and CEO
Applied Automation Technologies, Inc.
The primary goal of any shop is manufacturing dimensionally accurate parts at minimum cost. While quality control is indispensable, conventional dimensional measurement methods are not efficient. Digitizing measurement data where parts are manufactured and sharing that data with all manufacturing devices enables a modern competitive factory for many industries.
Implementing Industry 4.0 or “Smart Factory” manufacturing can sound daunting, but the successful Smart Factory works because in fact it is primarily a reduction of complexity, in which the data needed to optimize quality and throughput is largely generated automatically and instantly sharable throughout the enterprise with little need for human intervention.
Metrology data is the life blood of the Smart Factory: The challenge in smart manufacturing is to ensure not only that the measurement data itself is accurate but also shareable through digitization, and that a network is in place so that all manufacturing devices can immediately use the information. For that to happen, the generation of the data must be automated.

The Road to Smart Machining
The history of modern metrology can in a sense be tracking the movement of part measurement from distant metrology equipment to as close as possible to the production equipment itself. External coordinate measuring machines (CMMs) have become faster and more accurate over time, but require the removal of a part from, say, a machining center, placement in the CMM, and, when necessary, a return to a machining center for further work. These steps take time and introduce new opportunities for human or automation equipment error.
Another method of measurement is the use of dedicated gages that can be used to very quickly collect measurement data directly on the shop floor. These gages provide measurement data at high rates and are very effective for high-volume production. The disadvantage is their lack of flexibility: Designed for a single part, they are expensive to maintain or modify.
More recently, advanced measurement software—such as CappsNC from my company, AAT—enables machine tools themselves to perform measurements like a CMM. Offline programming with virtual machine models and using CAD data allow the machine tool to be programmed to perform complex measurement and reporting tasks, including multi-datum profile and true position analysis. This information can immediately be used to improve the machining process by adapting various machining parameters such as work offset and tool offsets. Realistic program simulations, collision avoidance, and optimum measurement path generations for multiple geometric features makes it very easy to program and flexible to make changes for any type of machine tool configurations. This ultimately enables a very easy method of quickly generating metrology data directly at the production source.
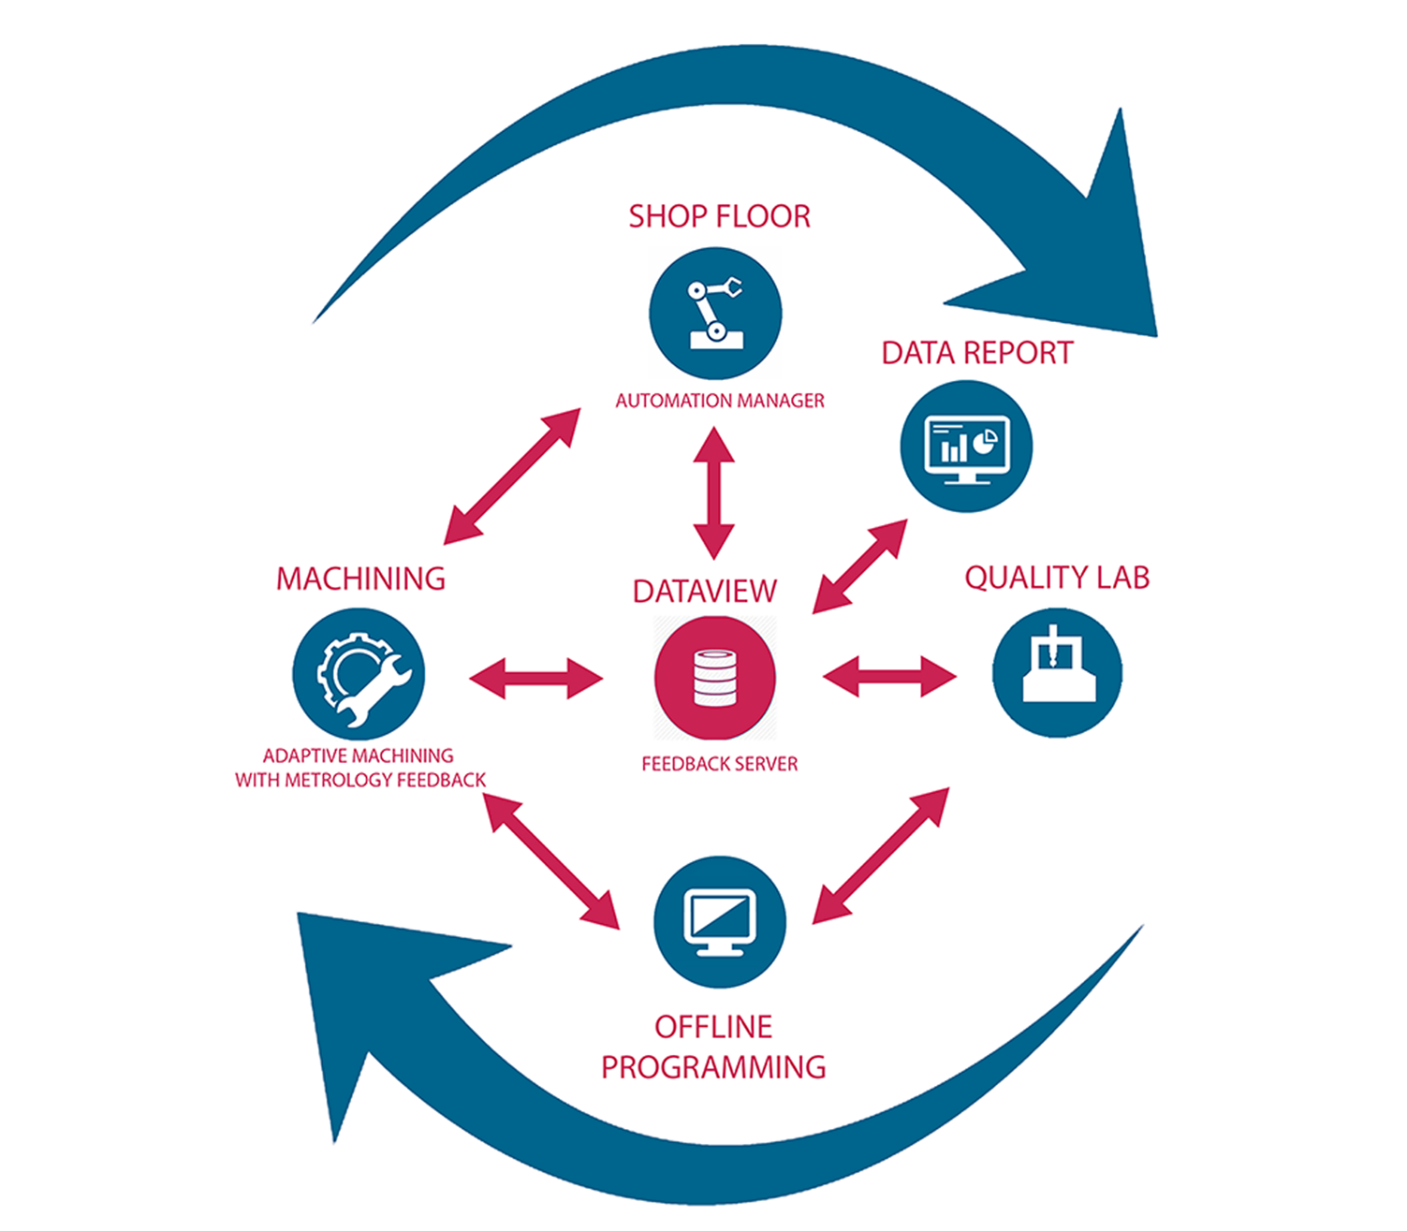
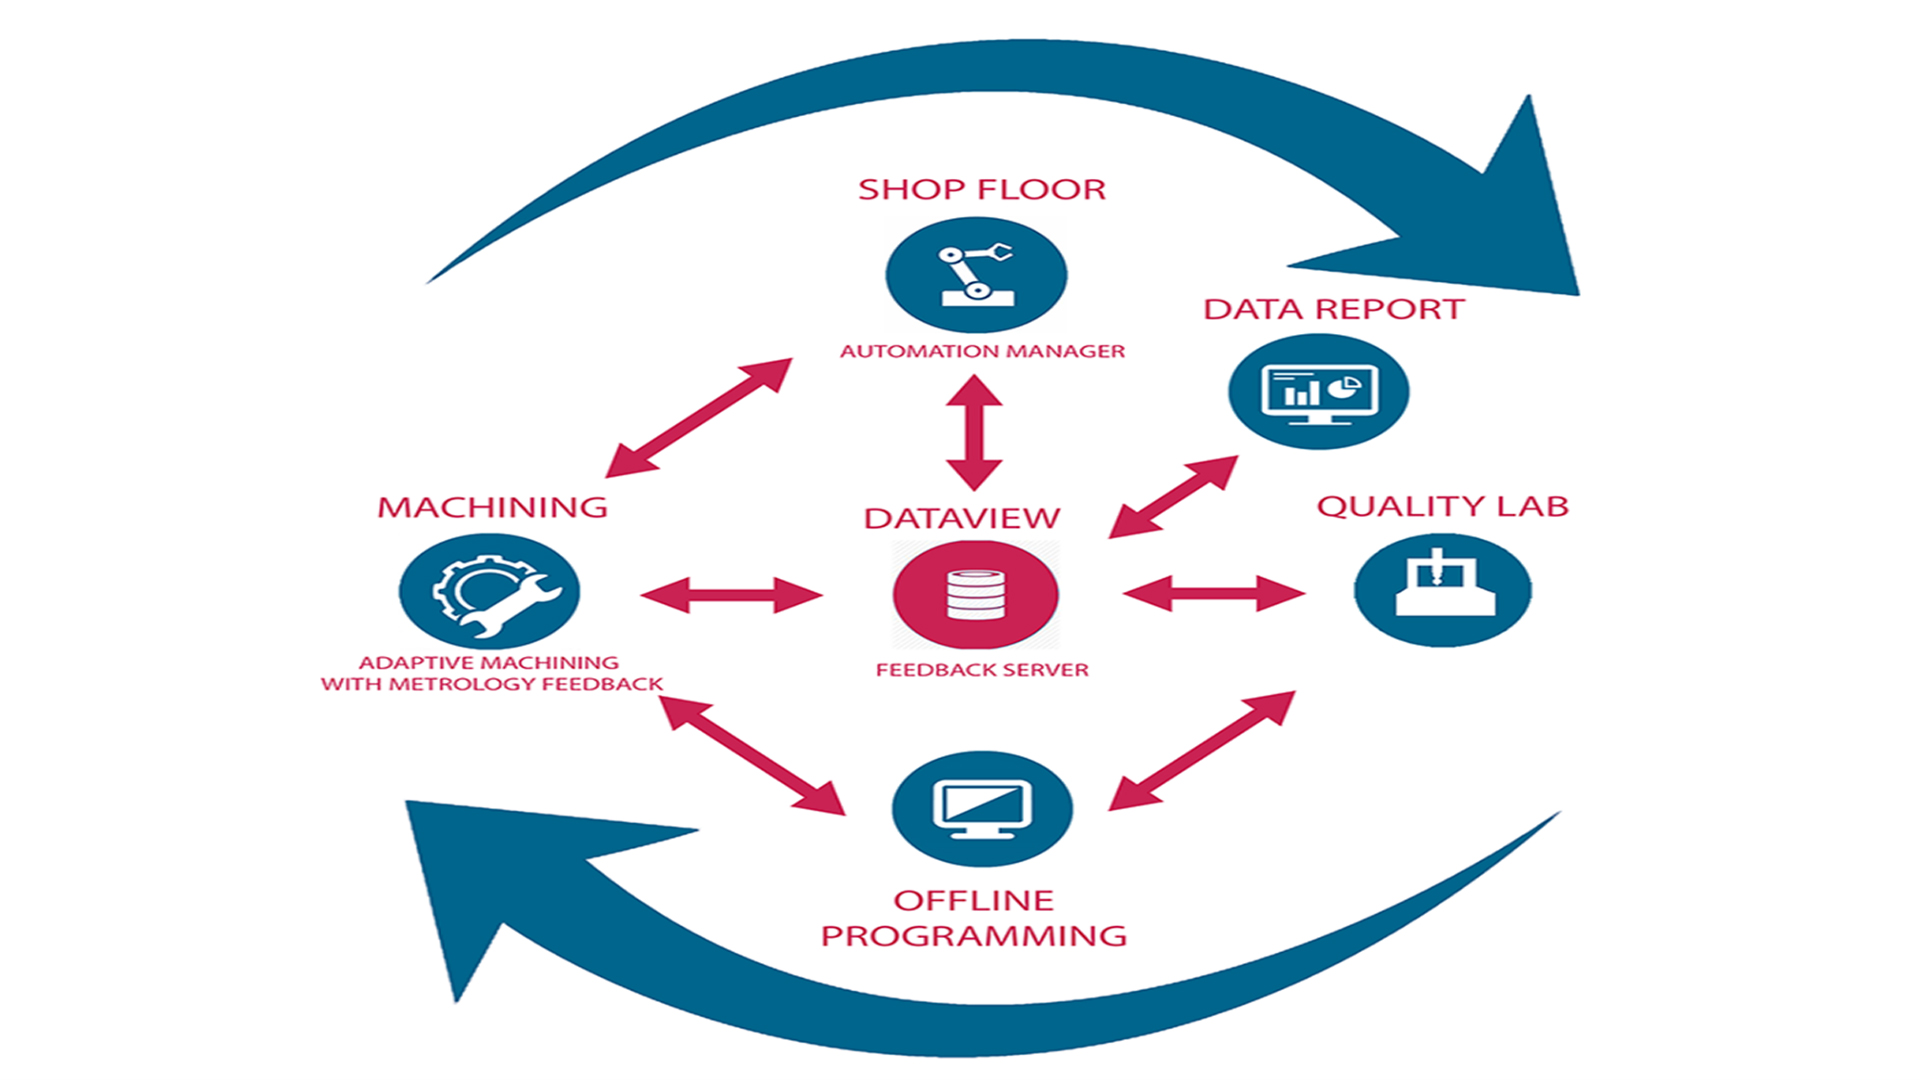
At AAT, we define the process of generating metrology information directly on the machine tool and immediately using it to make adjustments as “Smart Machining.” Using closed-loop feedback to provide correction for the machining process allows the system to be self-adapting to factors that affect the machining process and the quality of products being machined. Our software connects the machine tool with an ethernet cable and can read and write to any controller parameter and has a live connection with the machine tool controller. This ability allows a powerful metrology software to run outside of the machine tool controller yet work as a part of the machining process.

Although CMM-style inspection reports can be generated and saved on the server so that it can be reviewed by engineers or saved into a database for SPC analysis, what really makes the software powerful is its ability to convert the calculated metrology data into machining parameters and directly update the controller.
Machine Tool Traceability
Metrology is important for not only measuring the part itself but also for analyzing aspects of the equipment being used to make it. If metrology data is to be created on a machining center, the machine tool’s geometrical integrity must be monitored and checked periodically. In fact, even if the precise metrology data generation is not the goal, a machine tool still must be monitored for geometrical integrity for the sake of creating good parts. Having a simple method of measuring a calibrated artifact will allow geometrical traceability of the machine tool.

Having a simple tetra-gage master artifact calibrated and traceable with a calibration certificate can be a very useful tool to quickly monitor machine geometry by running a simple program. Although this type of quick check will generate measurement normally where the parts are going to be machined, it can give us very good information about the state of the machine and how it is changing. Both machine linear errors and squareness errors are calculated and by creating a run-chart of the data, day-to-day, or between-part changes can be monitored. Effects of thermal errors, or sudden changes due to an excessive load, can be observed. Most importantly, knowing the machine tool is still within its desired geometrical condition, all metrology and machining processes can be performed with confidence.
Depending on the machine tool kinematic configuration, a different artifact can be used to monitor specific characteristics. For example, a simple sphere can be used to monitor and correct for a 5-axis table machine or a 5-axis head machine kinematic changes. A program generated automatically by the software can be executed quickly and table center, head pivot center, and rotation axis vectors can be calculated and compared to how they should be.
A more detailed artifact that has many geometrical features and datum definitions can be measured to create a measurement report and compared to a report for the same part measured on a CMM. These type of PAS verifications are useful not just to monitor the machine tools geometrical integrity before investing into making a production part, but it also creates confidence in the metrology software’s ability to work with the machining center to create advanced metrology information.
From Smart Machining to Smart Factory
The rich data generated from on-machine metrology can do much more than benefit the machine on which it was generated. The measurements collected by various sources can be stored in offline databases and smart algorithms can be used to help analyze and make decisions that ultimately enable the factory to function to produce good data.
For this to happen, the information needs to be made electronically available and distributed to all clients within a factory-wide network. The factory-wide digital network acts as a circulatory system—or, if you prefer, a nervous system—that not only receives and records information but also makes it immediately available where it is needed.
This, along with automatic part transfer and part loading using flexible systems such as robots, creates a system with no or very little human interference and enables lights-out manufacturing. Having the ability to transfer metrology information between systems and making systems use this information in an automated process eliminates expensive fixturing, part holding and even the need to have machine tools precisely aligned to each other. Transferring metrology information between systems in real-time and make automatic adjustments is what enables reliable precision part manufacturing at low costs.
Minimizing Human Error
The smart-factory network may seem like an added level of complexity—another place where things can go wrong—but in fact creates value by reducing complexity. To understand this, it’s worth considering the role human operators play in the traditional machining process.
From setting a part offset, correctly calculating a tool offset to selecting which program to run, an operator makes many decisions and sometimes manually enters these parameters. Any small error can cause huge time loss and, in some cases, cause the downtime of machine or incorrect machining of the part. Even when everything goes right, human interruptions delay the process and may not be repeatable from one operator to another.
The Smart Machining process minimizes—if not eliminates—concerns with operator-related issues. A closed-loop system doesn’t face the risk of data being entered incorrectly or depend on a single operator to decide whether or how to adjust a critical parameter.
Speed as well as accuracy is improved: An automated system can collect metrology data, convert it into useful manufacturing parameters and apply it into the machine cycle very quickly compared to a system that depends on external measurement equipment and an operator to enter the data.
Making the System Smarter
If having real-time integration between systems is like having a nervous system that gathers and transfers useful information, then its effectiveness will depend on its “brain” or intelligence. The intelligence of a system requires two main components: First, it needs to have a structure that includes a fast network that can transfer information between different components, fast hardware that can process this information, and software that can analyze and process this information. Secondly, it needs to accumulate enough data to process and make decisions from. Creating a database is critical to making a system able to make good decisions. One could start by just collecting metrology data from parts being created and then looking at this data, gathering results and making decisions. Over time, data about previous successful decisions can be added to become a resource for comparing to a current data set, enabling a more-informed final decision.
By having a server that collects metrology data along with many other types of measurements such as temperature readings, chatter vibration during machining among many other possible data, an algorithm can be developed to make intelligent decisions in real time that will allow a factory to adapt to any changes from the normal running conditions and continue to produce good parts. A decision to schedule maintenance ahead of time by predicting that certain components will fail can be one of the possible decisions that can be reached from such a system.
Eyes on the Prize
The most important goal of digitalizing manufacturing with metrology feedback is to produce parts that are dimensionally correct regardless of the changing parameters by using closed loop feedback at the minimum manufacturing costs.
Metrology is the most relevant information aboutthe machined parts—and having control over this data, easily creating it,converting it into meaningful parameters and distributing it to systems wherethey are needed ultimately reduces the cost to make these parts. The benefitsare realized at each stage of the part-making process:
- Pre-Process: Preparing the part setup on the machine before starting the cutting process can be challenging, costly and time-consuming. Automation that quickly measures a part location can eliminate the need to have expensive fixtures and manual part setup. Parts that require a six-degrees-of-freedom coordinate setup are particularly difficult to set up with the standard work offset. A part measurement that produces a best-fit coordinate system can automatically be converted into a work offset that locates the part in 3D space and gets the machine ready for cutting.
- In-Process: Many variables may affect finished part quality during machining. As discussed, cutting tool wear—as well as the actual cutting tool shape under pressure during the cut process—affects how the part form will be generated. Although there are other methods of calculating tool wear and offsets, these are static methods and do not include tool deformation undercutting pressure. Final shape and size measurement can help calculate dynamic tool offset for these changes. An automated, cut-measure-cut closed-loop metrology-controlled process can achieve parts that are always in tolerance regardless of the complexity of their shapes.
- Post-Process: Data collected by many machining centers can be visualized for how the actual manufacturing process throughout the factory is working. Intelligent algorithms that can work with the data can calculate optimum manufacturing parameters ultimately creating a factory wide artificial intelligence system.
Trust is the foundation of all successfulbusiness relationships, and having trusted, accurate data enables deliveringtruth in machining. The potential benefits of Smart Manufacturing are great andgetting started isn’t as difficult as one might fear.

